RV Bathroom Updates: Penny Floor

Who knew you could get such a rich-looking floor … for pennies?!

We’ve done a lot to our bathroom already, so check these out to see how far we’ve come:

Next, we’ll take a look at what we’ve done to the tiny little floor in our tiny little RV bathroom! Here’s where we started:

IMG_0752
The linoleum was dated, dirty, and a bit torn up in places.  You can see the nasty ring where the toilet sat.

The floor was an old cream-colored linoleum that had a few cracks in it. There was nothing really wrong with it, it just would be completely out-of-place with all the other updates we’ve done, so it needed to go. We decided rather than putting the same wood plank flooring in (that was going into the rest of the rig), we’d do something a bit different in the bathroom. We wanted something that would be easy to clean, yet not your standard (read: boring) fare.  We are not boring people, so why would our bathroom floor be boring?!

Soooo .. we decided we’d put in a penny floor. WWUUUUTT?! We figured it’d be about the same price as whatever else we might want to install, and it would look way fucking cooler than anything else would.

Before we made any big decisions, we found some pictures of penny floors to see what others had done. If you search yourself, you’ll see there is a wide variety out there – some with really intricate patterns.

penny_floor_designs
Just a few of the many creative designs for penny floors.

After some discussion, and since this is our first of these, we decided we’d skip trying to get too creative with a pattern and just keep it simple. Everything we’d read also noted that, no matter which pattern you make, the base color of the floor shows through. Since the bathroom was being decked out in a tan-green-copper theme, we decided on green. That way, it’d match the patina that appears on old copper. Cool, huh? YUP. Additionally, we decided we’d just install the pennies directly onto the linoleum, so if, at any time in the future we (or someone else) wanted to remove the floor, it wouldn’t take the Herculean task of scraping all the damned things up, but instead, would mean breaking up the epoxy and peeling up the lino.

So, I dug into our change jar, my current purse (and the ones in the closet because I rarely clean them out before storing), and the car, and pooled all the pennies I could. Ironically, we also had found more than two dozen pennies in various spots in the RV, so those naturally got added to the pot. My initial thinking was that I had about half the pennies I needed for the entire floor. (Little did I know ….)

IMG_0847
Floor base is painted green – and the first pennies go in!

To make sure I wouldn’t totally fuck up the whole job from the outset, I started in the corner least likely to show on first glance. In retrospect, that was a huge mistake. The pennies in that corner are perfectly aligned and look fabulous, while as I worked closer to the tub (the part you see before you even enter the room), the pennies got less smooth in their pattern and I struggled to make them fit well.

TIP: Start in the corner you see first when you enter the room. That’s the spot that should look the best!

To glue them to the floor, I used regular bath/tile caulk – being careful to use enough to stick the pennies down, but not enough to spill out underneath the installed pennies.  As the days progressed (it took me nearly 5 days to finish putting the pennies down), some of the ones I’d already glued down came up, so I realized I needed to be a bit heavier with the glue.

And, before you ask, YES, they are all heads up. My semi-OCD wouldn’t allow a mish-mash of heads-up-heads-down, even though Danny dared me to go all willy-nilly on it. (JUST COULD NOT FUCKING DO IT.)

don't always even worlds most interesting man

Even when I found a couple wheat pennies – which would have looked crazy-good in the floor, I had to take them out of the pile because they would have had to be face-down (or else who would have known they were wheat pennies?!).

Moving along slowly. The damned things take FOR-FUCKING-EVER to put down. Plus, all that hunching over was murderous on my back!
Onward, forward, more and more pennies.

By this point, I had used all the pennies we’d had, plus another dollar or two Danny and I had gotten at the convenience store.So, because no one is willing to give over pennies anywhere (what the hell is THAT about?), we made a trip to the bank, the first of what would turn out to be three trips total. We thought the $7 we got would be more than enough. (Hint: NOPE.)

you_are_wrong

I emptied this batch from the bank into a bowl and kept moving forward on the arduous (and never-ending) task of gluing pennies to the floor. While digging in, one penny caught my eye. It had the word “LUCKY” written on it in black marker! The mere sight buoyed our spirits! At this point, there wasn’t much done in the RV yet and our general progress was pretty slow, so we were both feeling quite discouraged. It felt like a message from the Universe that we were headed in the right direction, and helped me sleep better than I had in weeks. Funny how the smallest thing can significantly alter your perspective, no?

Our lucky penny!
Our lucky penny!

We set the lucky penny aside, reserving it for a spot where it could be appreciated from any angle in the bathroom or outside the door of that room. Two more trips to the bank plus raiding our neighbors’ purses and change jars – for a total of more than $20 in copper coinage glued to the floor.

IMG_0866
By this point, I was so sick of gluing pennies. The hours it took … holy crap!! I couldn’t even imagine doing one of those huge floors!
IMG_0868
Are you as sick as I am of seeing pennies? UGH. Fucking shoot me. PLEASE.
IMG_0871
The task continues. It became more and more difficult to sit in that same position for the hours it took to glue the damned things down.
IMG_0932
FINALLY! All the pennies are in! I celebrated. You should, too!

Next, I taped off the toilet space, as well as taping off the open area that led to the copper piece covering the water pipe. Additionally, I taped up a piece of sample flooring in front of the door, so the epoxy would stop where it was supposed to. Lastly, I cut, stained/polyed, and installed the floor moulding.

I had to wait for the weather to get warm enough to apply the epoxy. The instructions say that it needs to remain above 50 degrees to set, and although it was pretty warm for December (we live in Florida at this time), it was still too chilly for a few days to get the job done. For the epoxy, research showed that Famowood Glaze Coat was the perfect choice. It came in a quart size (exactly what we needed) and only cost about $30.

Our choice of epoxy - Famowood Glaze Coat. Sooooo shinyyyyyy ~
Our choice of epoxy – Famowood Glaze Coat. Sooooo shinyyyyyy ~
IMG_1005
Mixing the epoxy takes about 15 minutes to do it right.

It takes about 15 minutes to mix the epoxy right – and you need to spend the time to do this properly. Once it’s mixed, you have a limited time (based on the temperature of the room) to spread it before it starts to set. I had plenty of time to use a small spatula to spread it over the floor.  I let it set for a few days, but quickly noticed that, although we had thought the RV was mostly level, the epoxy pooled a bit in the back end. So, clearly, we hadn’t gotten that whole leveling thing down yet. Okey dokey. Sooooo, although the floor is pretty much done, the front end (by the tub) is a little low on epoxy – and will require a second coat to complete the job. Gotta wait for warmer weather, so we’ll deal with it as-is for now.

But, just look at how cool it turned out!!

Before and After - Penny floor in our RV bathroom!
Before and After – Penny floor in our RV bathroom!

I’ll be sure to share final pictures once we’ve gotten every little thing finished in the bathroom, but you can see how amazing it looks for now.

As always, we appreciate your company as we make this journey! We hope we’ve been keeping it interesting! Namaste, my fellow travelers!

DISCLAIMER: We do not endorse or represent any brands or products, nor do we have any sponsors. If you are interested in sponsoring our journey or our nonprofit foundation, Vuja de Enterprises Foundation, we welcome your kindness and generosity!


RV Bedroom Updates: Redo Part 1

See how the first part of the bedroom updates is coming along!

To see where our RV started, check this out!

When we first got our RV, the bedroom was the room in the best shape. Although the mattress that came with it was too small and too thin (and too moldy-smelling) to be of much use, the rest of the room was good-to-go for quick updates.

The bedroom was in good shape, though as with most rooms in the RV, had a lot of wasted space.

We started by removing the cabinet doors, ugly window valances and blinds, and pull-down table in the corner. The room also came with an accordion door that was attached to the ceiling via a track and that slid out to cover the door area. We removed this, as well.

With other projects moving forward, the bed became the tool catch-all.

Next, we removed the old carpet. This room had the same blue carpet that was in the slide and on the stairs. It wasn’t in as bad of condition as the slide carpet was, but it was still pretty nasty. The carpet under the bed itself was in fabulous condition, so we decided to leave that be as it would act as an extra layer of insulation to keep the room warm, as well as to protect the clothes and other items we’d be storing there.  Most of the carpet came out pretty easily, though there were two pieces between the cabinets and upper part of the bed frame that necessitated detaching the top of the bed so we could get at them.  Danny got the honors of doing that!

The carpet under the bed was still in great condition so that is staying. You can see how worn the carpet is that came from those small areas between the cabinets and bed. The rest of the carpet in that room was much crappier.

Lastly, we removed all switch covers, detached the light fixtures, and removed the ceiling components (so they could be given a fresh coat of paint). Once the demolition (minor as it was) was complete, I painted the walls. Although I should have started with the ceiling first, we hadn’t yet bought the paint for that, so I started with the supplies we had (which is how most of this project has gone so far). I painted the walls the same gentle tan color (Olympic Antique Parchment) that the I used on the bathroom walls, using a primer-paint combo. It took two coats (plus touch-ups in some spots) to completely cover the old pattern of the wallpaper. I was really grateful that all my research showed it was unnecessary to remove the old wallpaper before painting it, as I’m sure that job would have seriously sucked (and most likely would have ruined the walls).

IMG_0612b
Even though the wall pattern was very light, it still took two-plus coats to cover it.

Once the walls were done, I painted the cabinets the quiet green color (Olympic Guacamole) that I used on the bathroom cabinet.  I really love the color scheme and how it warms up the entire place!  Plus, painting a room always gives it a refreshed feeling, ya know? As with the bathroom cabinet (and as it will be in the kitchen), we decided to paint the hardware a hammered black and turn the cabinet doors inside out. We really like how the inside of the cabinet doors has a more-polished Mission-style look to it, and feel that the original outside has a very dated look.

With the cabinets painted, I began installing the distressed wood peel-and-stick wallpaper that would go behind the bed / between the cabinets. I wanted something more than just paint here because the walls behind a bed (without a headboard) always get a bit dingy. With this wallpaper, it would be easy to clean off any pillow-scuff marks that would occur in the future. Plus, it just looks so freakin’ cool!

IMG_0991b
The peel-and-stick wallpaper is finished, and the new over-the-head shelf is built and attached.

I had to work on this in two sections because I couldn’t finish until the bed frame was detached and moved out of the way. So, in between, I built a long, narrow shelf to hang over our heads and hold small items like a glass of water, a book, or a cell phone. I really should have done a better job at estimating how big the shelf would need to be because in all honesty, the one I built was too small to be as useful as I would have hoped (especially because the RV frame curves up in that location limiting the height of anything you can put on it).  I may yet rebuild that piece to make it more useful. We’ll see.

Next, Danny put two coats of white paint on the ceiling, while I painted all the items that attached to the ceiling (like the speaker covers, lights, and skylight cover). I worked on covering the holes in the cabinet doors with putty and sanding them so that they’d have a clean look once they were installed inside-out. After I painted them, Danny installed the cabinet hardware, and reattached them to the cabinets.

Danny carefully measuring and installing the hardware to the original-fronts of the cabinets.
IMG_0958
Danny installing the cabinet doors. We love how the original-interior of the doors gives the outside a more-polished look.

Once the doors were installed, I wanted to add a little flair to them. Nothing too fancy or distracting since it’s important to keep one’s bedroom simple and as clear of clutter as possible (except, of course, for the giant pile o’ laundry our room usually has – lol). I had purchased these sweet mandala peel-and-stick tiles from UniQStiQ and hadn’t yet figured out where to use them, and felt that the small areas on these cabinets would be perfect.

UniQstiQ_mandala_wall_tiles

So, I measured the area and picked out two sets that would best represent each of us. Plus, I wanted to add a little festive touch in the middle section from our wedding, so I attached one of the tin-can lanterns that we’d made for the event to a small section of the new flooring and glued it to that section. Once we move in, it will hold my wedding bouquet. (I’ll post pics of everything in Part 2!)

With the addition of the peel-and-stick tiles and tin-can lantern, the cabinets look eclectic, just the way we like!
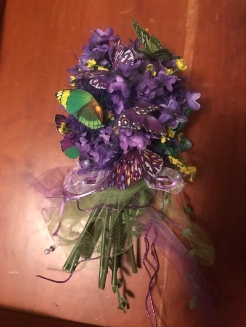
My wedding bouquet. It actually lights up with purple lights, too!

After all this was complete (doesn’t it look so freakin’ awesome already?!), I got to work on the first set of custom wood shelves that would give us even more storage. We’ll be putting these on both sides of the end of the bed – a smaller set for my side (since the wall is smaller) and a larger set for Danny’s side. I used some of the wood that I had left over, plus a couple new pieces. Again, as with all the wood projects in this RV so far, I used several different woods. So even though they’re all stained the same, the colors came out a bit different on each one. I’ve said it before and I’ll say it again: I love the way that wood-variety looks, even though it’s not “best practices for woodworking”.

I first built the over-the-window long shelf (with a lip). This was made from a piece of fence wood, so when I cut it into two pieces, the smaller piece had the top-edge of a fence piece which gave the shelf it made a unique outer edge. For the edges of each of the top shelves, I used the same moulding I had used for the bathroom shelves.  On the bottom of the shelves, I added a small shoe rack (for holding about 3 pairs of shoes). On the wall behind that section, I applied the same peel-and-stick distressed wood wallpaper (to protect the wall from the shoe scuffs that are bound to appear).  Lastly, I added an outside straight piece to which I plan to add several holders for my necklaces. Once all the updates in this room are complete, I’ll post final pictures of how everything turned out! This is how the shelves look so far.

More wasted space turned into functional storage areas! My side went in first, then I'll build Danny's side next.
More wasted space turned into functional storage areas! My side went in first, then I’ll build Danny’s side next.
Close-up of the simple shoe rack.

Next, I cleared the floor of all carpet staples and the billion tiny little carpet pieces that had been left over. This frustrating and painstaking task took me about an hour. I vacuumed the area and readied it for the floor planks.

The first vinyl floor planks go in smoothly!

For flooring, we went with TrafficMaster self-stick vinyl planks in Walnut Ember Java (though ours cost $0.89/sqft rather than the price shown in the link). Can you say, “WOWWWWW!!”?  It took less than a full case (or about $25) to finish the whole room. It went on really smoothly and was very easy to work with. Plus, it just gives the room a seriously elegant look and feel! I finished the job with a dark-stained floor corner moulding that polished it up perfectly!

IMG_0989
The finished vinyl floor planks and moulding!

Overall, the bedroom is coming along smoothly. I have to finish a few pieces of moulding on Danny’s side, but the custom wood shelves for that side will have to go in first. Once that is done, I’ll install the solar lights around the top edges of the room – and we’ll be ready to move in! Check back for Part 2 of this two-part series to see the final pictures of how everything turns out!

Thanks for traveling with us! Namaste, my friends!

DISCLAIMER: We do not endorse or represent any brands or products, nor do we have any sponsors. If you are interested in sponsoring our journey or our nonprofit foundation, Vuja de Enterprises Foundation, we welcome your kindness and generosity!