

Read the introduction to this series on updating our road-beast’s bathroom, if you haven’t read that yet. It will give you the overview of all of the projects we’ll be doing in our RV bathroom.
First project: Shower/Tub Refinishing!
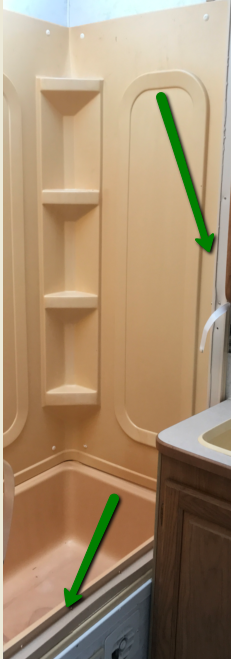
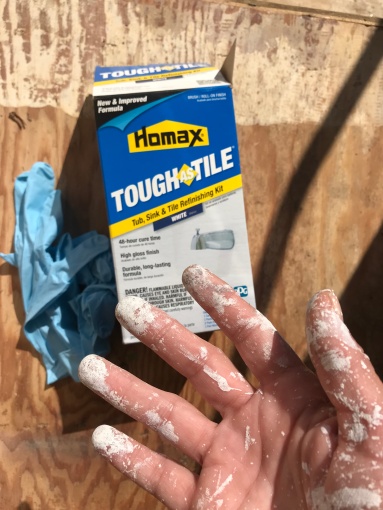
This is what we started with – a faded and yellowed shower/tub that was strong/solid enough to not need replacing. After some research, we learned that the best way to update it was to refinish it with a liquid epoxy that would give the plastic a porcelain-like finish. Further research showed that Homax Tough As Tile was highly-rated and within the budget we were willing to spend.

I had read some tips and tricks from others who had epoxied their own tubs (gotta love Pinterest!), so I had a clear idea of what to do and what not to do.
I gathered supplies to prep the tub for resurfacing.
Supply List:
- Sand paper (220 grit)
- Cleaners (vinegar-water solution; Simple Green; Goo Gone)
- Face mask (that stuff is seriously smelly, especially in a small room)
- Fan (to suck the smell out)
- Homax Tough As Tile
- Paintbrush
- Paper towels
- Gloves
I began by removing the metal panels that previously-held the long-gone shower door. They were held in with screws and glue-bonded on, so after removing the screws, I had to pry them up and off, which was no easy feat. Once they were off, I coated the area in Goo Gone, which is the best stuff for removing sticky crap from anything. I also removed the hardware (shower head, faucet) so I had a clean work-palette.
Impediments now gone, I lightly sanded the entire tub to give the epoxy a better chance at adherence. Using Simple Green, I cleaned off the years of grime that had collected while the RV sat unused. That alone made the tub better than I had expected, but it was not anywhere close enough to call off this epoxy job. Then, the whole tub/shower got rubbed down with a vinegar-water solution (about half-half). Once that was thoroughly dry, it was time to get started on the epoxy.
I opened all the nearby windows, including the vent in the ceiling, donned my face mask, and got to work. The skylight over the shower provided ample sunshine to light my way.


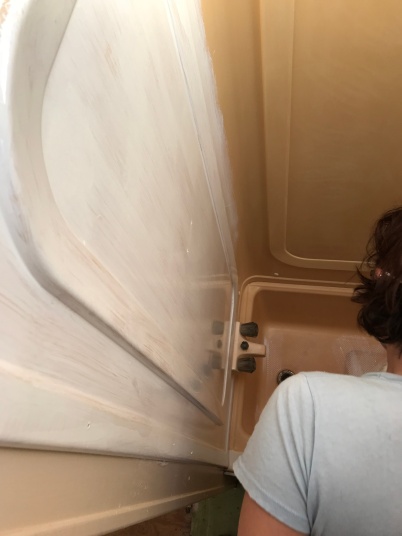
The epoxy was much watery-er than I had expected it to be. I was thinking it would probably be so thick that the quart-container wouldn’t be enough for two solid coats. To my surprise, it was thin enough that I had to return to previously-painted spots to smooth out drips in a lot of places.
Unfortunately, there were a few drips I missed (after putting on the second coat) that are now permanent parts of our RV shower. Oh well, I guess we can just say that they give it character, right?!
The instructions for the paint-on epoxy state that you have to put the second coat on about 3 hours after putting on the first one. So, after finishing the first coat (took about an hour including fresh-air breaks), I assisted Danny with demolition in the sitting room while the epoxy dried.
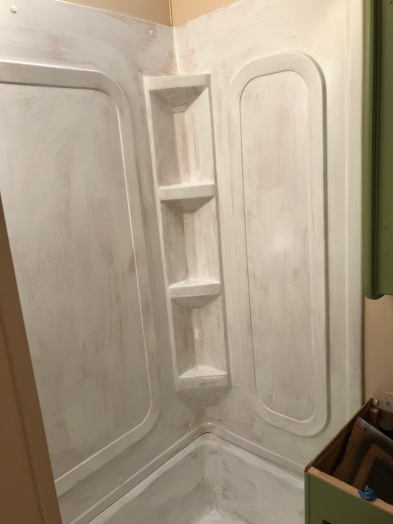
The second coat went on smoother than the first since it was going over the top of porcelain-coating. Luckily, we live in Florida, so the temperature in late-November was still plenty warm enough to allow the epoxy to set before the cool night crept in. I went back the next day to see the results of my handiwork.

Overall, I am mostly pleased with how it came out. Except of course for the couple of drips I didn’t catch, and also for a few spots where I didn’t get both coats on heavily enough, so they look a little patchier than I hoped they would. I would call this refinishing job a success, especially with it being the first I’ve ever done.

Avoid this mistake:
Wear gloves. I mean it! Being the type of person who does most things (like working in the garden or tearing out rotten wood) without wearing them, I forget how important they are. The Homax Tough As Tile box even came with the damned things (so awesome of the package to include them), and it still didn’t sink into my thick skull to actually put them on. So, I was left with porcelain-coating on my hands for about three days, as that’s how long it took to scrub and wear off. Be smart and don’t repeat my mistake.
LAST PIECE OF ADVICE: Be careful bending over if you’ve done the top part first and are working on the bottom – tub part second. That stuff will stick right to your hair and take about a week to wash out.

Where to buy that kind of toilet and shower for trailer in Canada
LikeLike
I’m wasn’t sure, so I did some quick research and found the RV Superstore Canada (https://rvsuperstorecanada.ca), which might be the perfect place!
LikeLike
Why did you choose to get the paint version vs. the spray?? Thank you! It looks beautiful!
LikeLike
Great question! Sorry it took me so long to respond! I missed this comment! We chose the paint because it went much farther than the spray. We would have had to use twice as much of the spray and the drips would have been worse.
LikeLike
Hello! I’m desperately wanting to refinish my tub/shower in my RV. My concern is that the product advises against applying the Tough as Tile to plastic showers because it doesn’t adhere as well and will chip over time. How has this held up for y’all? Thanks!
LikeLike
Hello! It will chip over time, yes. The bottom of our shower has chipped us, so we just put a mat inside the shower. I would say you might want to put an extra coat or two on it, or spray (or paint) a primer on it first. That might help. It’s certainly not a long-term solution, nor will it hold up over a LOT of use (like daily/weekly use). But, it’s certainly good enough if you’re planning to just camp (using it once in a while) – rather than use it regularly.
LikeLike