Slide Renovation: Part III – Walls, Ceiling, and Slide Border

RV Slide Renovation: Part III-of-III – Walls, Ceiling, and Slide Border – Watch as we finish the repairs and upgrades to our RV slide!

If you’re just joining us, check out this post introducing Rhoda, our road-beast RV renovation project, or this one showing the extent of her water-damage, which we’re in the middle of repairing. Or, check out our other posts of the RV renovations we’ve written about so far.

This is a three-part series – so you can follow our progress on the slide renovation from start to finish.

IMG_1300
The new plywood is installed in the floor – and we continue forward on our renovations!

So, before the final flooring that you saw in Part II went in, Matt came by and helped us get the roof and ceiling frame repairs completed (which I’ll show in another post soon).  During parts of this, he worked alone (with Danny and I available as his shop-bitches, as needed), so we were free to continue our work in other areas. Danny moved forward with kitchen demolition, while I worked on the slide walls.

Since we needed to repair the slide border before we built the missing slide wall, I decided to prep and paint the remaining walls. I knew it’d take a couple days to get two full coats applied-and-dried, and by that time, we’d have the slide border repaired. I began by sanding down all of the wood paneling on the bottom half of the slide walls. On the upper walls, I repaired random holes, and cut in the windows.

IMG_1301
Walls are sanded and prepped, and the cut-in has started.
IMG_1303
First coat of tan is on the walls! It looks a million times better already!
IMG_1302
All (already-installed) walls got their first coat!
IMG_1308
The second coat of tan and the first coat of green go in! The warming contrast has made the place feel so freaking HOMEY everywhere we’ve applied it!

For the walls, we used the same tan and green contrast that we’d used in the other rooms we’d painted (bedroom, bathroom, fridge). I just loved the combination because of how warm-and-homey the colors made it feel. The tan is Olympic Antique Parchment and the green is Olympic Guacamole.  While I worked on this, Matt and Danny finished up the repairs on the small-wall area over the slide. The whole roof and ceiling supports had to be rebuilt in that area, as well as the framing for the area over the slide. In some places, this required custom-cut/designed pieces of framing and shims to make everything fit perfectly. I say again how thankful I am to have had such a great friend engineer all that, as it was out of Danny’s and my capabilities to do the sturdy job it needed.

IMG_0980
Danny provides leverage while Matt installs new wood in the small wall area above the slide.
IMG_1043
Matt shimming up the walls, like the stud he is!
IMG_1048
Roof, new framing, and wall-area (above the slide) are complete! Now … remove the rest of the rotted wood!

After Matt headed home, we still needed to remove/replace the rotted wood from the slide border, and rebuild the walls and ceiling of the slide. So, we started with the slide border, since that was the biggest and most-urgent of the tasks.  The entire kitchen-side piece of the slide border was rotted, as well as the long piece that went across the top (and provided the strength that held the whole thing in at the top!). So, we got to work tearing it all out!

IMG_1319
I take the pry-part of the hammer to the rotten wood; grossed me out how little strength it took to pull it all away. You get a sneak peek of the area of kitchen wall/cabinets we’re renovating, as well!
IMG_1332
Danny takes the reciprocating saw to the rotten wood. You can see the pretty new roof/ceiling right above him! No more leaks!!!!
IMG_1338
Removal of the rotten parts of the slide border is complete! Can I get a “hells yeah!” … ?

In removing the wood along the top of the slide border, we realized it was just glued together pieces of plywood – all making an abnormal width we’d have to recreate on our own. Since we didn’t have the equipment (or patience, tbh) to do this, we installed this “sub-wall” before installing the two – 2″ X 6″s that would make up the outside edge of the slide border.

IMG_1340
Danny cut and installed the thin wood planking to go behind the nice wood we planned to install on the slide border.
IMG_1370
We didn’t get many pictures of the slide border wood going in – but this one shows the completed rebuild, while Danny’s in-process in cutting out the hole for the window. Don’t mind the toilet paper – it was winter and we both had the sniffles something fierce!

When we installed the new slide-border wood, it took both of us (one to hold, one to use the screw gun), so we didn’t get many pictures. For the kitchen-side edge, which sagged because it didn’t get proper support from the rotten wood, one of us had to hold up the slide while those pieces went in – to reduce the sag. It’s still there a bit, which sucks, but we’ve done the best repair we could do, so we’re satisfied.

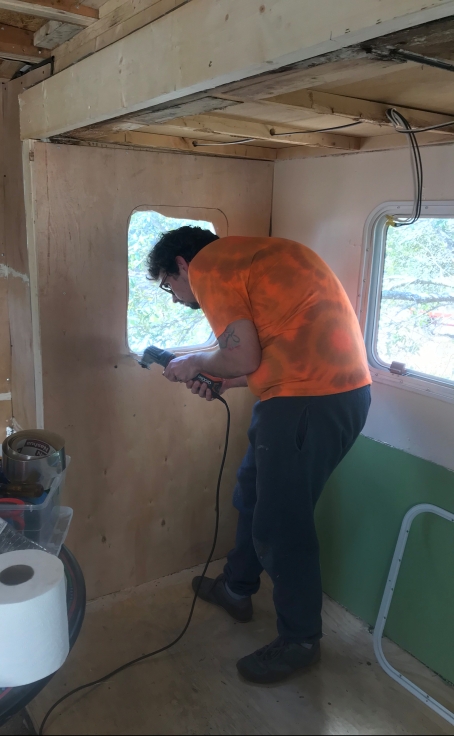
With the rotted wood gone and the new wood in, the place smelled so fresh, it was like we had a whole new house! Next, we cut and installed the missing wallboards in the slide, which Danny finished off by using our friend Michael’s Rigid JobMax Oscillating Multi-Tool, to cut out the hole for the window.  (As an aside, we both firmly agree that oscillating tool is our new favorite, and our very next tool purchase.)

We used a beautiful wallboard that had designs in it that reminded me of bird’s-eye maple (one of my favorite woods); it almost physically hurt to paint over it (but it had to be done!). [As another aside – full of those today! – I was also a bit annoyed that we couldn’t change out all the walls to the new stuff because they were just so damned niiiiice, but that was not in the budget (which we’d already seriously blown by this point) … so it wasn’t even discussed).]

IMG_1375
Beautiful new wallboard is installed, and the window is cut and re-framed. YAY!
IMG_1404
Such a shame to paint over that pretty wood (she winked, slyly), but it had to be done!

To finish off the slide border, we used our Minwax Early American 230 stain to finish off the exterior wood – and pull the whole slide together. Since the slide-length was 12’9″, it was prohibitively expensive to purchase two 2″ X 6″ pieces of wood of appropriate length. So,after installing the inner unstained piece (which was the right length based on the wood-piece left at the right-hand end of the slide border), we cut two 6′ pieces, stained them, and installed them on either side – leaving a one-foot hole in the middle, as I had come up with a creative way to solve the issue of the missing foot of wood.

IMG_1501
Danny installs the stained slide-border wood. You also get a sneak peek of the chair-rail border we put on the slide walls and the crown moulding we used on the wall above the slide.
IMG_1503
The hole that stressed Danny the fuck out! (Check out the wood wall borders!)

Danny couldn’t figure out what we could do to fill this hole and I only kept him guessing for one night. I asked him to cut me the one-foot piece, kissed his nose, and told him not to worry! While he slept in preparation for his impending night shift, I went to my computer – made a design that represented the both of our spirits – and got out my wood-burning kit. It took over four hours, but the results were as fabulous as I’d hoped they be!

IMG_1505
This says it all.
IMG_1524
I wood-burned a specialty piece for the slide border – then put moulding along the connection points. The rest of Rhoda is filled with custom-wood projects, but this one makes my heart smile.
IMG_1526
The custom-wood-burned middle section stands out, but not too much.

As you can see in the picture above, we have already installed the insulation in the slide ceiling, so next we put up the ceiling board. It took waaaaaay more screws than I ever expected, which we found out by going through a “needs more; needs more!!” process, while we tried to get the small waves that showed at the straight ends to disappear.

img_1532.jpg
Danny adds even more freaking screws to remove the wavy spots. You can see the tape we used the mark where the ceiling studs were (for ease in screwing in the right place!).

Once we finished the ceiling installation, we painted it the same tan color as the walls, rather than the white we used on the other ceilings. (We also did this in the bathroom!) Then, we cut, stained, and installed chair-rail / border all along the connection points we had built (plus all those that matched on the other side). Lastly, we installed ceiling and floor moulding to pull the whole thing together and finish it with a flair.

My mom used chair-rail moulding throughout our house, which at one time, was painted a similar combination of colors (she also loved many shades of green). When I showed my mom the pictures of what we’d done, she commented on how it reminded her of her own home, and that made us both smile. It was a lovely shared moment in a dark time, and I will hold onto that forever.

IMG_1793
The slide repairs and renovations are complete and the curtains are in place! The only missing piece is the finish-moulding that will go on the edge of the slide floor (after we’ve installed the rest of the flooring). Sneak peek of the kitchen here!
IMG_1792
You can see the finished catbox area in this picture, too. We still have to re-install the ceiling lights, and you’ll see those in the pictures we take once the couch and desk are built/installed.

We couldn’t be more pleased with the polished-yet-down-to-Earth look our RV slide has now, and hope you like it, too! Thanks for being on this journey with us! We know we’re taking longer than anticipated to start the actual traveling, and we appreciate your patience!

Before & After - Slide

Next, we build the custom couch and custom shared desk! These are two of our biggest and most complex builds, so be patient and stick with us! Namaste, my friends!

Let your lovelight shine with a little soul music!

DISCLAIMER: We do not endorse or represent any brands or products, nor do we have any sponsors. If you are interested in sponsoring our journey or our nonprofit foundation, Vuja de Enterprises Foundation, we welcome your kindness and generosity!

Slide Renovation: Part II – Floor

RV Slide Renovation: Part II-of-III – Floor – Watch as we nearly-entirely rebuild our water-damaged slide floor. 


If you’re just joining us, check out this post introducing Rhoda, our road-beast RV renovation project, or this one showing the extent of her water-damage, which we’re in the middle of repairing. Or, check out our other posts of the RV renovations we’ve written about so far.

This is a three-part series – so you can follow our progress on the slide renovation from start to finish.

So, at this point, we’ve already deconstructed the water-damaged areas, and pulled out all (still-partially-wet) insulation. We mopped up the remaining water, and set up a fan to dry that section of the RV for the first time in likely a year. Then, we treated the whole area for about a week before moving forward – so that we could be sure there were no remaining mold spores to reinfect what will be our new home.

To ensure the mold was eradicated, I used a two-part approach:

  1. Sprayed the entire area with a bleach-water solution – three or four times over the course of three days (leaving enough time to dry fully between coats).
  2. Sprayed the entire area with a strong vinegar solution – the same way as I did with the bleach solution.

I read that bleach only kills surface mold, and the vinegar is needed to kill the deeper – and more dangerous – hidden mold. So, the whole affected area got three heavy doses of both. I have a pretty bad mold allergy (which I constantly fight in Florida), so we needed to be sure we removed it fully. Plus, we reaaaallly don’t want to ever have to rebuild Rhoda again – especially due to hidden mold.

IMG_1214
Rotted wood and (still-wet) insulation has been removed. At least we know that bottom webbing is water-tight!

So, after all this, our next step was to fortify the floor more than it was, as well as to insulate it with much higher quality insulation than had been in there. Rather than installing a new dining set on this part of the slide, we planned to build a double desk (with a pull-out dining table). I work at home (and will be working from the RV once we move in) – and so this area will need to be as custom-designed as we can make it.

Because of the amount of time we’d both be spending on this area of the floor – and the fact that it pained me to realize the flooring that you see in the picture above is the wood-and-webbing that makes up the bottom part of the slide – we wanted to reinforce the wood-slats there to make sure the floor never has any strength issues. Additionally, the extra insulation will help keep the section of the RV we’ll be using most warmer than it would have been.

IMG_1215
Slide flooring removed down to the wood/webbing that makes up the underside of the slide. Fortification of this side of the floor is in progress.

To add to the floor-structure, we cut and screwed in 1″ X 2″s around the frame and across the wide sections. As you can see in this picture, the slide-border was all rotted – and the wall on this side had sagged a bit due to the lack of support. We’ll talk about how we repaired that in Part III of this three-part series, so stay tuned.

IMG_1221
The sections that got the most extra support were the two areas where Danny and I would sit at our co-working desk.
IMG_1226
The framing is complete! The extra-thick slats on the right-hand section is where the couch framing will be, so every place the couch will sit – got extra fortification.

Making sure to add extra support where my desk chair, Danny’s desk chair, and the couch would be, we completed the updated framing in the slide. We then added Johns Manville R-13 poly-faced insulation for 2″ X 4″ walls, which we taped in with aluminum tape. On top of this, we stapled thick black visqueen. We did this to seal the area more fully – and create a much-thicker wind barrier, since our research has shown how cold RV slides can be in the winter.

IMG_1271
The new framing is complete, the insulation is installed, and the thick visqueen barrier in in the process of being stapled in. This area will be the best-insulated part of the whole camper!

Before installing the plywood floors, we had to clean out the areas around the giant bolts that hold the whole slide together to the steel frame. It was an absolute bitch to get all the carpet and gunk out from around those buggers, let me tell ya! Then, when installing the plywood, small chunks had to be cut out of the wood over the areas where each of those sat. Despite these minor annoyances, we got the plywood installed, then sealed the place where the new floor met the walls with self-expanding foam.

IMG_1269
Giant bolts of annoyance. Oh, how they mock me!
IMG_1292
First piece of plywood installed. You can see the areas along the back wall where the bolts are placed.
IMG_1297
The plywood is installed – and self-expanding foam applied!

Once all this was complete, we continued our work on the walls, ceiling, and slide-border, which we’ll detail in Part III of this series, and which you’ll get a sneak peek of at the end of this blog. When I was able to get back to finishing the floor, I installed the same flooring we had put in the bedroom. Except for the penny floor in the bathroom, this flooring will be throughout the RV.

As I mentioned in the first post on our bedroom updates, for flooring, we went with TrafficMaster self-stick vinyl planks in Walnut Ember Java. It took three-quarters of a case to complete the slide floor, since we gave a small section of it a different flooring treatment. The slide contains an opening to the outside that will be located directly behind our new custom couch. In this section of the couch base, we’ll keep one of the two catboxes – so we can access it by pulling up the couch-seat or from the outside easily. So, for this floor-section, we treated the entire area with three coats of Black Jack Roof-Guard Elastomeric Coating. For the area surrounding that, we put down peel-and-stick carpet tiles (in tan). We’re hoping this thick coating will keep any “over-spill” from soaking into the wood, and the carpet will act as kitty-paw litter-catches and keep it from traveling beyond the catbox areas.

We’ll be traveling with five cats (rather than the seven we’d anticipated having), since the November loss of our beloved Midnight and the March loss of my dearest Coconut. To make this home theirs as much as ours, we’re building two catbox areas (to keep the mess contained and potential smell at a minimum), a cat tower, and specialty-kitty areas. I’ll highlight all these in a later post, so keep checking back (especially if you plan to travel with cats in your own RV).

Now, back to the floor! Aside from the catbox area, we put down a base coat of paint before installing the flooring. I hadn’t remembered to do this in the bedroom, and had a few issues with tiles not sticking as well as they should. After researching it further, I found a recommendation to paint the floor first, so that’s what I did here (and what we’ll do when we install the main flooring). Like it was in the bedroom, the pieces went in pretty easily. The hardest part was making sure cuts I made (for around corners or floor-bolts) were straight and in the right spot. It took me about an hour (or so) to finish installing the flooring planks.

IMG_1545
Admit it! You’re checking out the sneak peek of the walls, aren’t you?! BUSTED!
IMG_1550
Half the floor planks are installed. In the bottom-right corner, you can see the whitish-area where we used the elastomeric to protect the floor.
IMG_1552
Wood floor planks are installed, elastomeric area painted. Next, I installed the carpet tiles around the catbox area.

After this, we worked to finish the other parts of the project, then installed the floor moulding, which finished the whole job perfectly! I’m not going to post a finished picture here – so move to the next installment to read about how we fixed the walls, ceiling, and slide – and you can see a final picture there!

Thank you, dear friends, as always – for continuing on this journey of life with us. Next stop – a refurbished slide!

DISCLAIMER: We do not endorse or represent any brands or products, nor do we have any sponsors. If you are interested in sponsoring our journey or our nonprofit foundation, Vuja de Enterprises Foundation, we welcome your kindness and generosity!


Slide Renovation: Part I – Deconstruction

RV Slide Renovation: Part I-of-III – Deconstruction – Watch as we tear out all the water damage, so we can begin building anew.

So, it’s been a few months since I’ve posted, and it’s been quite the busy-busy time!

If you’re just joining us, check out this post introducing Rhoda, our road-beast RV renovation project, or this one showing the extent of her water-damage, which  we’re in the middle of repairing. We’ve done a host of other repairs, so we hope you catch up on all we’ve written about since the beginning of this project. We’ve done a lot more than we’ve shown so far, and I’ll keep working on these to catch up to our actual progress! So, stay tuned!

We’ve been in-flux since the first week of February, when we moved out of the location where we’d been living for a year-and-a-half. Rhoda, our road-beast RV, was not yet ready to be moved into, so we stayed a month at our friends’ Shelly and Ronnie’s, while we rested from the previous six months of continuous-and-stressful on-the-go. During this time at “the spa” (as we call it), we did more recovering than RV-work, If I’m to be honest, though my work schedule never slowed down. It was a tough time mentally, though since, during our stay, we found out that my mother was nearing the end of her life, and so was my 18-year-old cat, Coconut.

Over the course of the month, our plans changed several times, and we nearly went to Missouri to care for my mom in her last weeks, but she ended up traveling here to Florida, so she could spend her last days near where all her kids lived. After the month was over, we moved Rhoda and ourselves to Matt’s house. It was still my permanent address (after living there two times totaling eight or nine years), and the majority of my furniture and belongings were still there. Plus, Matt’s house feels like home (he’s always been my brother-from-another-mother), so it was the best place for us (me, especially) to be during this highly-transitional and difficult period.

Matt and Melissa at GNP sign 2_Trip_MayJune2014
My dearest friend Matt and I – during happier times – at my favorite park on a weeks-long cross-country trip we took with my niece in 2014.

My mom, JoAnne’s, struggle with advanced COPD (that turned into stage four lung cancer) ended on the morning of Saturday, March 24th, 2018. She’d gotten to spend time with all three of her kids and both brothers before passing, and went in peace. Two days later, Danny and I held Coconut, whose nasal infection had actually been a nasty, fast-growing tumor, as the vet gave her the last shots she’d ever have. As I’ve struggled with Bipolar II depression and anxiety my whole life, it’s been a really low point for me lately, and the quicksand (as I call it) is high. So, if you don’t mind, before we get to the next set of RV-work pictures, I’d like to share a few of my mom and my little Coco-bean.

20151225_125427
This was taken a couple years ago when my brother and I traveled to my mom’s house in Missouri to help build a big shed.
IMG_20140727_122226390
This is another picture of my mom during the shed project. Growing up, she was inspiring with her range of skills and abilities, and I learned a lot working as her helper on all sorts of projects.
Mom years ago
This picture of my mom was taken when I was in high school. I get my thousand-yard-stare and piercing eyes from her, though hers were green and mine are my dad’s blue.

IMG_1686[1]
18-year-old Coconut – about three weeks before her death, enjoying a cool day at Aunt Shelly’s spa. She’d been getting medicine for her nasal congestion / cold for a couple weeks by this point.
IMG_1707[1]
Coconut in her favorite spot on the mama-cat’s lap. She always spent time with me, no matter where I was in the house, but in the last month, she spent as much time on my lap as could get.
IMG_1732[1]
Coconut all snuggled on Aunt Shelly’s lap – both of them perfectly content with their current positions.
Thank you for letting me share that with you. Now, let’s focus on work (which has always been a salvation for me), and get to the work we did to repair and renovate the slide.

If you remember, the water damaged area in the roof was in the kitchen/slide corner over where the slide begins when it’s in the all-the-way-out position. By the time we figured out how deep the water-damage rabbit hole was, we realized we’d have to re-do nearly the entire slide (along with a big section of the roof / kitchen ceiling, several kitchen cabinets, and the countertop).

IMG_0627
The slide before we started tearing things out to see the extent of the damage.
IMG_0623
The recliners were still in really great condition, though they needed a good cleaning. We pulled them out, scrubbed them up, and donated them to the community where we were living at the time.


IMG_0621
The valances (of course!) had to go, and the dining set was rotted from the rain it had taken through the leaky roof. There was never any question about replacing that nasty carpet, either. If you look in the top left corner of the picture, you can see the area where the water was coming in.

As Danny’s primary task was demolition and removal, he began with tearing out the dining set. We also un-attached and removed the recliners, so they could be cleaned and donated to the community where we lived at the time. We considered keeping them, but planned to build our own custom couch, so they had to go.

IMG_0634
The first inklings of the water damage begin to show.
IMG_0707
My handsome husband takes a well-deserved break from the removal and demolition process. Don’t worry – he wore a mask while doing the actual work.
IMG_0738
The dining set is removed – and the rotted/damaged walls are torn out. You can see how damaged the slide-border is.
IMG_0755
Another picture of the mess. By this point, part of the ceiling in the slide had been removed, and so had the top kitchen cabinets that were rotted all the way back to the wall.

It took nearly a week of long, hot, icky labor-filled days to get through the demolition, but Danny was a trooper. While he worked on demolition, I focused on getting the kitchen prepared for renovation, and began building a cat tower, which I’ll detail later.

IMG_0812
Danny cuts out the slide carpet, which was full of mold. The floor itself would also have to be replaced, as you can see.
IMG_0819
With all the carpet out, you can see the rot goes for two-thirds of the slide.
IMG_1214
We pulled the rotted wood out. Underneath, the thin insulation that sat over-top the stiff webbing making up the slide floor was still wet. EEEEWWWW

By the time the demolition was finished, the entire RV smelled a thousand times less like mold, and I wasn’t having such bad mold-allergy reactions every time we went in there (which was a plus!).

With our work cut out for us, our friend Matt swooped in and helped us get the roof repaired. We were way over our heads with that job, so it was a true saving grace for him to be so amazing like that. That repair included the damaged roof, as well as the damaged small wall-section over the rotted part of the slide. I’ll detail everything on that repair soon, but here’s a sneak peak of that portion after the initial repair-work was complete.

IMG_1048
The roof repair is complete, and so is the repair to the small wall-section over the slide.

Thanks for sharing our demolition-journey! This three-part series includes two more sections – one detailing the repairs/renovations to the walls, ceiling, and slide border, and the other details what we did to fix the slide floor.

Namaste, my friends – and happy travels! Remember – no matter how long your life is – it’s always too short, so make every moment count.

Move next to Part II – Floor and then on to Part III – Walls, Ceiling, and Slide Border!

DISCLAIMER: We do not endorse or represent any brands or products, nor do we have any sponsors. If you are interested in sponsoring our journey or our nonprofit foundation, Vuja de Enterprises Foundation, we welcome your kindness and generosity!